We have heard other RV’ers talk about boondocking (living without hookups) and say, “it’s great, but don’t expect to run your air conditioner.” Some of these folks know a lot about solar and batteries and living off-grid. I’m happy to report that we are having a different experience. We have been off-grid since early April (without propane or a generator) and we stayed cool all summer with our heat pump air conditioner. We’ve been parked in full sun and 100-degree heat, completely comfortable inside Howie. Now that it is getting cooler, we are using the heater and enjoying that too.
It might be a specific case – we have a lot of roof space for solar panels, we installed a large battery bank, we have a small trailer that is easy to cool down/warm up, and we have not thoroughly tested various temperature/humidity combinations. We might end up plugged into external power during the winter in order to have enough energy for heating (with colder, shorter days and likely more clouds for less solar charging). We just started this experiment in May and we don’t know how reliable our setup will be.
On the other hand, we aren’t toughing it out nor sweating half the day. Whenever it starts to feel warm inside, the AC goes on (at a minimum on the Dry setting) and we’re comfortable. We routinely turn it on just to use some energy so we aren’t “wasting” what is coming from the solar panels.
Honestly, it’s pretty amazing. I’ll try not to go on and on! Just know – there is a “heat pump happy dance” now.
The heat pump
What is a heat pump?
From the Trane website:
“Technically, a heat pump is a mechanical-compression cycle refrigeration system that can be reversed to either heat or cool a controlled space. Think of a heat pump as a heat transporter constantly moving warm air from one place to another, to where it’s needed or not needed, depending on the season. Even in air that seems too cold, heat energy is present. When it’s cold outside, a heat pump extracts what outside heat is available and transfers it inside. When it’s warm outside, it reverses directions and acts like an air conditioner, removing heat from your home.
“A heat pump consists of two main components: an indoor air handler and an outdoor unit similar to a central air conditioner, but referred to as a heat pump. The outdoor unit contains a compressor that circulates refrigerant that absorbs and releases heat as it travels between the indoor and outdoor units.”
(Side note that I can’t help but smile over the word “transporter”)
Basically, a heat pump is an air conditioner AND a heater. It’s just as efficient as an air conditioner and more efficient than a heater that burns fuel to create heat.
We bought a ductless version called a mini-split. Compared to our old air conditioner it is much quieter. Even more so compared to our old heater which had ducts running different places. We barely hear it when it’s on.
Apparently buildings can use a central heat pump plus ducts to move air around (like central air conditioning). The difference with a mini-split system is that there are no air ducts (the refrigerant goes to individual rooms instead), and you can have registers in different rooms to control the temperature separately by register.
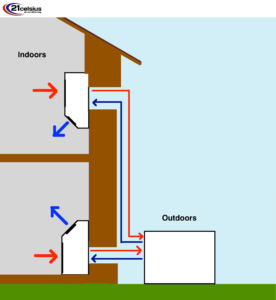
For the purposes of this post, I’m going to use the terms “heat pump” and “mini-split” interchangeably, hopefully that’s not too confusing. Just trying to figure out how to write the previous 2 paragraphs was confusing to me, but maybe a drawing will help.
This is a simple mini-split diagram of the flow of air (thicker arrows) and refrigerant (thinner arrows), although our particular system has only one indoor unit:
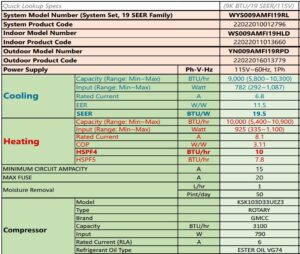
We bought a 9000 BTU heat pump made by Pioneer. The SEER (Seasonal Energy Efficiency Ratio) rating is 19.5. It uses 120V AC power, so the inverter needs to be on for it to run.
Model Number: WYS009AMFI19RL-16
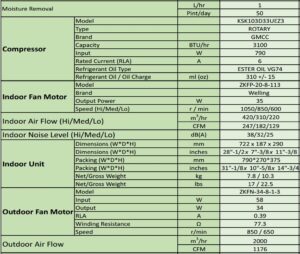
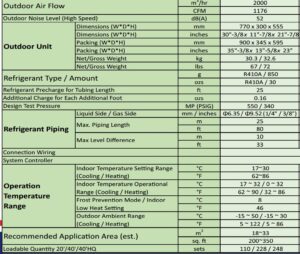
The spec sheet (in 3 parts) for further details:
This is the smallest mini-split we could locate, knowing we didn’t have much interior space to cool/heat. We had it shipped to us but I believe there are similar options at hardware stores. There are also HVAC companies that will install it in your home, although I don’t know how they would react if you asked them to put one in your travel trailer or RV.
Installation
Choosing the heat pump was easy. Installing it in a travel trailer was not nearly as straightforward. Luckily John was willing and able to figure it out. Huge thank you to John!
He might have developed this idea in the first place when he looked at the trailer tongue, now free of propane tanks and batteries, and wondered what could sit there. He might eventually get a toolbox, but when the heat pump was suggested I immediately jumped on that instead. An actual air conditioner? A more efficient heater? Um, yes please, let’s do that!
We had removed our roof air conditioner because we rarely used it, it was old and loud and inefficient, and it added some extra inches to the trailer height that seemed unnecessary. Plus without the roof AC unit, we have more room for solar panels. I figured I could continue with the “heat acclimation” concept and just plan not to be anywhere too hot for too long.
But a heat pump, that is a worthwhile experiment. All in the name of more data collection!
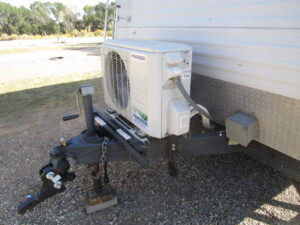
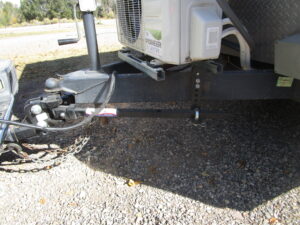
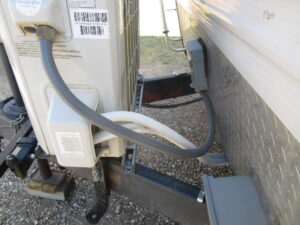
The external unit of the heat pump sits on the tongue. John added a couple Unistrut mounting bars, and it seems to be riding well. It has tagged along with us from Texas to Arizona to California to Wyoming to Utah. So far, so good!
I do suspect we have voided the warranty by doing this, but we’re OK with that.
One thing that had to change was our hitch equalizer (weight distribution) system because the lever tensioners were in the way. John found another design that hangs below the hitch, and looks to be an improvement anyway. This added some cost and effort, but also resulted in an upgrade to our tow system.
Hooked up for travel:
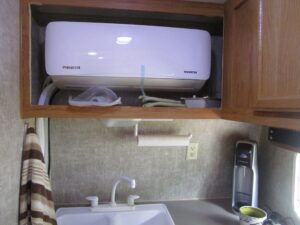
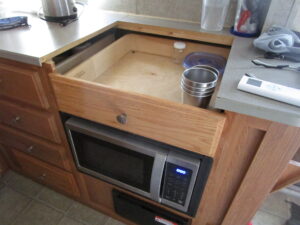
The indoor unit (also called a register) fits inside a kitchen cabinet, or what used to be a cabinet. John removed the doors and I removed most of the contents. It’s a good location because the air blows straight back through the whole trailer, plus it’s as close to the hitch as it could be.
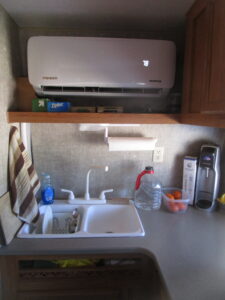
Another photo after John covered the lines on the left side. The heater is running in this picture. It’s nice that there is still space under the register for a few items.
John figured out a way to run lines from the inside unit to the outside one. He snaked everything through holes straight down through the floor and looped them up toward the outer unit. You can buy longer refrigerant lines if the inner and outer units are further apart; in our case, 10 feet was barely long enough.
In addition to the refrigerant lines, John ran AC power and controller lines between the inside and outside units.
He then spent time leak-checking the system. He’d purchased a vacuum pump and some cheap HVAC gauges. When he initially pulled a vacuum on the system, it didn’t hold. It turned out that the leak was most likely in the gauge hose connection, which he figured out after redoing each end of the refrigerant lines to the heat pump.
Once he fixed the gauge connections, he pulled a vacuum and then “released the hounds!”, I mean “released the refrigerant!” No leaks, and everything is looking good so far.
In case anyone is thinking of doing something similar (and I highly recommend replacing whatever you have with a heat pump system), John suggests that getting a professional HVAC person involved could be a good idea. Their professional set of tools alone would be helpful. He looked into this for our installation, but the quoted cost was more than we paid for the heat pump itself.
What it does
The mini-split has several modes:
– Cool, for air conditioning
– Heat, for heating
– Dry, for dehumidifying
– Fan, for moving air
Cooling has an operational range of 32° to 122° F (outdoor temperature) and 63° to 90° F (indoor)
The heating range is 5° to 86° F (outdoor) and 32° to 86° F (indoor)
Dry mode works best at 32° to 122° F (outdoor temperature) and 50° to 90° F (indoor)
If the temperature is outside the “operational range”, according to the manual the unit will perform less than optimally. Pioneer sells an Arctic version (including an electric heater on the outdoor unit) that will work fine at outdoor temperatures as low as -12° F.
We have tried all of the modes and I’m now officially spoiled for climate control. I don’t yet have a lot of data, mostly some qualitative remarks along with an intention to run actual data collection tests for a future post.
Dry – works amazingly well in humid conditions. It feels like air conditioning and I think uses less energy compared to Cool mode. I didn’t collect any power usage numbers while we were in Texas, and we haven’t felt one drop of humidity on our travels in the west, but eventually I’d like to compare Dry to Cool for effectiveness and power draw.
Cool – very quickly drops the temperature inside our trailer, even when it’s 100 degrees outside. It’s efficient, and it generally doesn’t take long before the power draw drops below the amount of incoming solar (as long as there is sunshine on the panels). In other words, we are frequently running the AC at the same time that the batteries are being charged.
Heat – we love to turn it on first-thing on chilly mornings to make it much easier to get out of bed. So far we haven’t experienced below-freezing temperatures, mostly down in the low 40’s. Mornings with the heater on are comfortable and we aren’t running the batteries down too far before the sun starts recharging them again.
The one thing the heat pump doesn’t do is heat the floor (did someone say… radiant heating?), so we still wear rubber sandals in the house and I use my heated footrest on colder days.
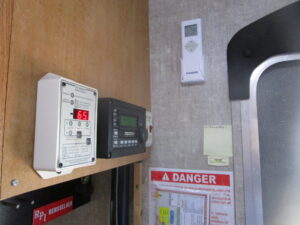
I do have a little bit of data. This comes from watching the wattage numbers on the battery meter (when there is no incoming solar). I would love to find a way to graph this or collect cumulative numbers specific to the heat pump, but don’t know how to do that yet. We don’t have a standard AC plug that I can connect the Kill-A-Watt to.
1) 77° F outside, full sun, 72° F “Cool” setpoint:
– I turned on the air conditioner; power draw = 860 watts
– It ramped up to 1000 W in the early stages of cooling, then dropped to zero after about 15 minutes
– The wattage numbers ranged from 0, 130, 250, 430, to 670 watts (up and down) for the next couple hours in order to control the temperature
I should have repeated the AC test when it was actually hot outside (Moab in August), but didn’t think to do so. Qualitatively, energy usage is not much higher compared test #1 even when it is very hot outside. I also need to include the indoor temperature since we now have the thermometers for that. Future experiment!
2) 42° F outside, no sun (before dawn), 78° F “Heat” setpoint:
– I turned on the heater; power draw = 150 watts as it was getting warmed up (before the fans turned on)
– It ramped up as it heated up and started blowing warm air, up to 800-1100 watts
– Soon the power level dropped down and stayed between 300-500 watts all morning
– This brought the inside temperature up from 55° eventually to 70° F , as the outdoors also warmed up over a few hours
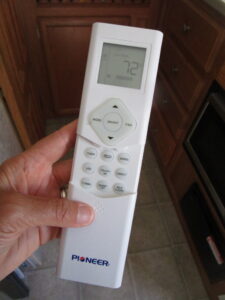
There is a “Follow Me” mode on the remote, which uses the temperature sensor on the remote instead of the one at the register. The temperature at the register can change pretty quickly, while the rest of the house takes longer to warm up (or cool down). In our case especially, the register is in a small space and enclosed on 4 sides, so the air around it heats (or cools) right away.
I did a follow-up “Follow Me” test, with quite different results in levels of heating and energy usage:
3) 43° F outside, 53° F inside, no sun (before dawn), 70° F “Heat” setpoint, “Follow Me” turned on with the remote sitting on the table about 10 feet from the register:
– Similar startup and warm-up power draw, from 200 watts slowly going up to 1400 watts in about 10 minutes (a bit higher on the top end this time)
– The power readings then dropped to 900 to 1100 watts and stayed there for about an hour as the temperature at the remote increased from 53° F to 63° F
– Over the next hour there was a slight drop in power, to around 700 to 900 watts while the temperature increased another 5° F (close to the setpoint)
– I stopped the test at that point because everything was warmed up nicely
– Total battery usage was about 2.2 kWh over 2.5 hours; significantly higher than test #2, but our house also warmed up significantly faster
So just be aware of the difference it can make to activate “Follow Me”. On our system, the setting turns off every time we turn off the heat pump, so it defaults to “Off”.
4) “Fan” mode: Power draw is less than 10 watts at all fan speeds (basically negligible)
Functions
The programming is reasonably versatile, with the following functions available:
– Mode (auto, cool, dry, heat, fan)
– Eco (energy efficiency) air conditioning
– Vacation (freeze protection) mode, which we might use overnight in the winter
– Timer for delayed on or off
– “Follow me” mode to use the temperature sensor on the remote to control the unit
– Turbo to reach the temperature setting as quickly as possible
– Swing and direct to auto-swing the louver and set the air direction
– Self-clean
Home improvements
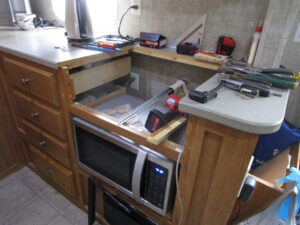
Not specifically related to the mini-split, but we needed to move some things out of the cabinet over the sink to make room for the indoor register. We have the ability to reorganize because there is no longer a propane stovetop, nor propane ductwork under the counter. So much extra space! I’m gradually rearranging the contents of the kitchen as John creates new opportunities.
Here’s where the propane stovetop used to be, with the beginnings of a new drawer:
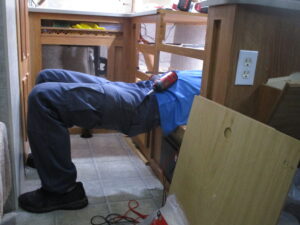
Either a new yoga pose or John is hard at work (or quite honestly, he might be taking a nap):
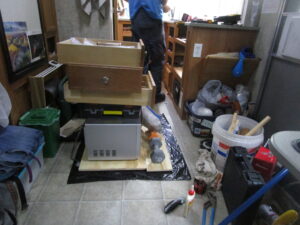
Sometimes we have a pile of stuff in the middle of the trailer:
But eventually something new comes out of it:
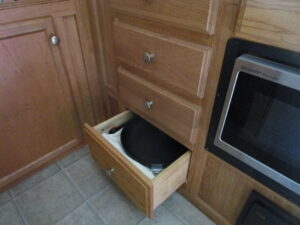
There is also space available where the propane ductwork used to be, so John added a fourth drawer below the original three.
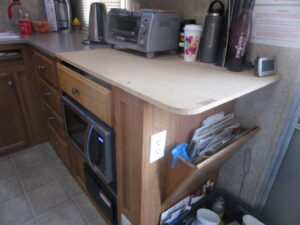
There is now a “hidden” shelf under the corner of the countertop, because John couldn’t stand to let that space go to waste. It’s a bit hard to access (or photograph), but a good place to put paper products:
John is working toward a more permanent countertop (project pending); here is the one that is temporarily in place. More counter space, yay!
Summary
We love everything about the new heat pump. It’s super quiet, efficient, fast, safer, and perfect for our space. Removing all propane-powered appliances and replacing them with electric versions has worked even better than we expected.
Cool and Warm ! – Nice write-up. I’m surprised that you never used the term mini-split at any time to describe the product. From what I can see, it is a mini-split. From the datasheet it appears that the outdoor unit weighs ~ 70 lbs and the indoor is 22 lbs? Not sure why they list both a Net and Gross Weight. Is Gross weight the weight after adding the refrigerant? The challenge with these appliances is to make sure that the refrigerant lines don’t leak and are properly filled w refrigerant. Did you have to load the refrigerant from a storage container? I have heard that some models come with line sets that are “pre-charged” with refrigerant and that don’t require doing a vacuum test. Although, how would one then make sure that the lines and connections don’t leak? Do you know anyone else who had tried this in a trailer?
Thanks.
Marc
Hello Marc, and thanks so much for your questions!
We just spent some time trying to understand “heat pump” vs. “mini-split” and maybe we’ve got it finally? Tell me if this doesn’t make sense: A mini-split is a type of heat pump system. Heat pumps can be used different ways, including as central AC/heating with ducts. A mini-split doesn’t have ducts. Instead it has at least one register, and the refrigerant moves between the outdoor unit and all the registers. Each register can have different temperature/fan control settings so you can heat/cool individual rooms differently.
So yes – we have a mini-split, which is a type of heat pump (if I’m getting this right). I’ve updated the text and added some explanation at the top of the post to try to clarify, although I might have made it more confusing instead. I can work on it if you have suggestions.
Re: weights, yes, those weights sound approximately correct to John (70 pound outdoor unit, 22 pound register). We don’t know either why there is a Net and Gross weight listed for both. It could have something to do with the refrigerant, your guess makes sense. We can’t really weigh them right now to check though 🙂
John has plenty of details about checking for leaks and getting the refrigerant into the whole system, so if you (or anyone else) is thinking of doing this type of installation yourself, he would be happy to chat directly and try to answer any questions. Here’s a summary: The refrigerant was already on board in a reservoir inside the outdoor unit. The instructions said to pull a vacuum on the lines and make sure the vacuum holds before releasing the refrigerant from the reservoir into the lines (and inside unit). He tried that but the vacuum didn’t hold. In the process of trying to figure out where the leak was, he applied positive pressure so he could use soapy water to look for bubbles. Once he found the leak and fixed it, then the system would hold vacuum, and he could release the refrigerant.
It seems like even a “pre-charged” system would need some kind of leak testing; we have a hard time imagining a situation where all of the connections were already in place when you got it. But that’s just based on John’s limited experience.
We haven’t seen any other travel trailers or RV’s with mini-splits (yet) but John did see one on a YouTube video. Possibly what inspired him to think we could do this ourselves too. Hopefully more people will try it, and hopefully they will have a good experience like we are (so far)!
Thanks again Marc!
Another answer for you Marc – Pioneer tells me that “The net vs. gross weight is just the weight of the system itself (net) vs. the weight of the system inside the carton (gross, used for shipping purposes).”
The front/hitch area of a trailer can get shrapnel at highway speeds; every enclosed trailer I’ve had used some diamond-plate for protection (I see in the photo yours does too, on the lower foot or so). Have you considered building an armored box to protect the outdoor unit – something that can be removed (and used as an outdoor coffee table?) when you arrive and set up?
Hello Kurt!
Yes, John reminds me that we did apparently talk about adding a protection box to the outer unit on the hitch. He’s still thinking about doing that – so, great suggestion! 🙂 I like the idea as well.
What is your solar setup? watts, batteries, Bms
Hi Glenn!
We have 4 395 watt panels (1580 watts total) and 4 138Ah batteries (about 6.3 usable kWh). We got the batteries used, without an overall BMS system (although each individual battery has its own BMS for cell balancing within the box). We make sure we aren’t charging them if the temperature is too low; we also make sure we don’t run them down so much that an individual battery drops out and potentially unbalances the system.
More details and pictures:
Solar
https://allelectricproject.com/our-solar-system/
Batteries
https://allelectricproject.com/the-battery-swap/
Hi Marcy, I was thinking of Glenn’s question and it reminded me how convenient a System Diagram or Schematic can be in describing your whole system and it can be helpful for troubleshooting. For year’s I’ve been supporting my Mom’s off-grid system which has evolved over time. I’ll e-mail you a diagram I created that helped me keep track of the system since I was remote and it also helped me whenever someone wanted to know what went into her system. Mom certainly has lost track after so many changes…
Good feedback! We created a diagram and have used it a lot for reference. It exists in a blog post, halfway down:
https://allelectricproject.com/ac-dc-systems/
What I need to do is add numbers to it (like Glenn asked for) and then add it to the “Our Trailer” page so it isn’t buried in an older post.
Thanks Marc!